You’ve made lemon pepper chicken before. You’ve probably even made a parmesan crusted version. But I can tell you with confidence, you’ve never made it like this. The secret isn’t in the lemon pepper or the parmesan. It’s hiding in plain sight, and it changes everything about this crispy chicken recipe.
This Lemon Pepper Panko Parmesan Chicken is the kind of easy weeknight meal that feels like a weekend treat. It’s got that perfect crunch, a serious flavor punch, and a juicy interior. But most recipes miss one critical step. They leave the most important texture on the table. Ready to find out what it is?

Let’s fix that. I’m going to show you the method that turns good baked chicken cutlets into the best you’ve ever had. This is the version you’ll make on repeat.
Recipe Overview
Here’s the quick snapshot of what we’re making today. It’s straightforward, but the magic is in the details.
- Cuisine: American-Italian Fusion
- Category: Main Course
- Prep Time: 15 minutes
- Cook Time: 20 minutes
- Total Time: 35 minutes
- Servings: 4
The Secret Ingredient That Makes All the Difference
I’ve hinted at it, and now I’ll tell you. The secret is cornstarch. Not a lot. Just a light, even dusting on the chicken before it hits the egg wash.
Why does this work? Cornstarch creates a micro-barrier. It seals in the chicken’s natural juices fiercely. More importantly, it gives the wet egg mixture something incredibly grippy to hold onto. This means your lemon pepper panko and parmesan crust locks on. The result is a coating that shatters when you cut into it, without sliding off. It’s the pro-trick for truly crispy chicken.
Why This Method is Better (My Pro-Tips)
Beyond the cornstarch, my method has two non-negotiable rules. Break them, and you’ll get a good dinner. Follow them, and you’ll get a great one.
First, dry your chicken thoroughly. Pat those cutlets with paper towels until they feel tacky, not wet. Any surface moisture is the enemy of a crisp crust. Second, we use a two-stage breading station: flour/cornstarch, egg, then crumbs. Skipping the first dry layer is why most homemade cutlets fail.
Finally, we bake on a wire rack set over a sheet pan. This lets hot air circulate completely around the chicken. No soggy bottom. Every inch stays crunchy.
The “Upgraded” Ingredient List
Simple ingredients, treated right. Here’s what you need for pro-level flavor.
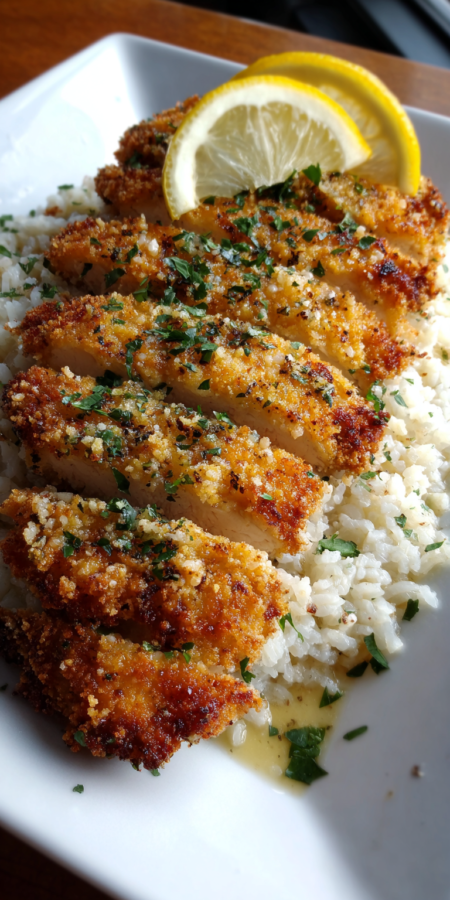
Lemon Pepper Panko Parmesan Chicken Recipe
The “Upgraded” Ingredient List
The Pro-Method (Step-by-Step)
Notes
Enjoy your homemade Lemon Pepper Panko Parmesan Chicken Recipe!
Nutrition Information
- 4 boneless, skinless chicken breasts (about 6 oz each), pounded to 1/2-inch thickness
- 1/2 cup all-purpose flour
- 1/4 cup cornstarch
- 1 tsp kosher salt (for the dry mix)
- 2 large eggs
- 1 tbsp whole milk or buttermilk
- 1 1/2 cups panko breadcrumbs
- 3/4 cup finely grated parmesan cheese (not pre-shaken from a can!)
- 2 tbsp lemon pepper seasoning (check salt content)
- 1 tsp garlic powder
- 1/2 tsp smoked paprika (for depth)
- Olive oil or avocado oil spray
- Fresh lemon wedges & chopped parsley, for serving
The Pro-Method (Step-by-Step)
Follow these steps in order. Precision here builds the perfect texture.
- Heat your oven to 425°F (218°C). Place a wire rack inside a rimmed baking sheet. This setup is key.
- Pat chicken cutlets completely dry. Mix flour, cornstarch, and 1 tsp salt in a shallow dish. In a second dish, whisk eggs and milk. In a third, combine panko, parmesan, lemon pepper, garlic powder, and paprika.
- Dredge each cutlet in the flour mix. Shake off the excess. This is your foundation layer.
- Dip the floured chicken into the egg wash. Let the excess drip back into the bowl for a full count of three.
- Press the chicken firmly into the panko-parmesan mix. Use your hands to pile the crumbs on top and press so they adhere. Coat both sides well.
- Place the breaded cutlets on the wire rack. Give them a generous, even spray with oil on top. This mimics frying and promotes browning.
- Bake for 18-22 minutes, until the crust is golden-brown and the chicken reaches 165°F internally. No flipping needed.
- Let rest on the rack for 5 minutes. This lets the crust set. Finish with a squeeze of fresh lemon and parsley.
Common Mistakes & How to Fix Them
Even great cooks hit snags. Here’s how to avoid the big two.
Soggy or Patchy Crust: This is usually from a rushed egg wash dip. If the egg is too thick, it slides off and pulls the crumbs with it. The fix? Let the excess egg drip off thoroughly. A thin, even layer is the goal. Also, make sure your panko mixture is dry—grate your own parmesan; the pre-grated stuff has anti-caking agents that can burn.
Bland Flavor: Not all lemon pepper is created equal. Some are mostly salt and citric acid. Taste yours. If it’s weak, boost it. Add an extra teaspoon of grated lemon zest to the panko mix. For more punch, add a pinch of cayenne to the dry flour stage.
Variations for the Adventurous Cook
Mastered the base recipe? Try these pro-swaps to make it your own.
Swap half the parmesan for finely grated pecorino romano. It’s sharper and saltier. It makes the flavor pop in a new way. For an herby twist, add two tablespoons of finely chopped fresh thyme or rosemary to the panko mix.
Want a different crunch? Use crushed pork rinds or gluten-free crackers for half of the panko. It adds a fantastic, savory note. You can also add a tablespoon of everything bagel seasoning to the crumb mix for a fun, garlicky-oniony twist. If you love the garlic-parmesan combo, you might also enjoy our garlic parmesan chicken skewers for a fun, handheld option.
Nutrition Notes
This is an approximation for one serving (one chicken cutlet), based on the ingredients listed. Your exact numbers will vary.
- Calories: ~420
- Protein: ~42g
- Carbohydrates: ~28g
- Fat: ~14g
- Saturated Fat: ~5g
- Fiber: ~2g
Your Pro-Level Questions Answered
These are the questions I get from cooks who want to level up.
Can I make this ahead of time?
You can bread the chicken up to 4 hours ahead. Lay the breaded cutlets in a single layer on the wire-racked sheet pan, cover loosely with parchment, and refrigerate. Bake straight from the fridge, adding 1-2 extra minutes. Don’t bread them the night before—the crust will get soggy.
What’s the best side dish for this?
You want something that won’t compete with the crunch. My go-to is a simple arugula salad with a lemon vinaigrette. The peppery greens cut the richness. For a heartier meal, roasted broccoli or a quick orzo pasta tossed with olive oil and herbs works perfectly.
How do I get an even crispier crust?
For maximum crunch, use a two-temperature bake. Start at 425°F for 10 minutes to set and brown the crust. Then, without opening the door, reduce the heat to 375°F for the remaining 10-12 minutes. This finishes cooking the chicken gently without over-browning the coating.

A Few Final Secrets
Here’s the insider knowledge that ties it all together. That cornstarch trick? It works for oven-fried fish and zucchini fries, too. The wire rack method is non-negotiable for any baked “fried” food.
Always taste your seasoning blends before you use them. Your palate is your best tool. Finally, let the chicken rest. Those five minutes allow the frantic juices to relax back into the meat. You’ll get a juicier bite every single time.
Now you have the real secrets. This isn’t just another parmesan chicken dinner idea—it’s your new standard. Go try it. Then, come back and tell me in the comments: did that cornstarch trick change the game for you? I want to hear how your crispy chicken turned out! If you’re craving another lemony, garlicky chicken dish, our lemon garlic butter chicken is a fantastic, saucy alternative.