Struggling to find one meal the entire family will eat without a chorus of “I don’t like that”? I hear you. We’ve all been there, staring into the fridge, hoping for a miracle. If you’re looking for another crowd-pleasing, easy dinner, you might love this Ranch-Style Chicken Taco Soup Recipe.
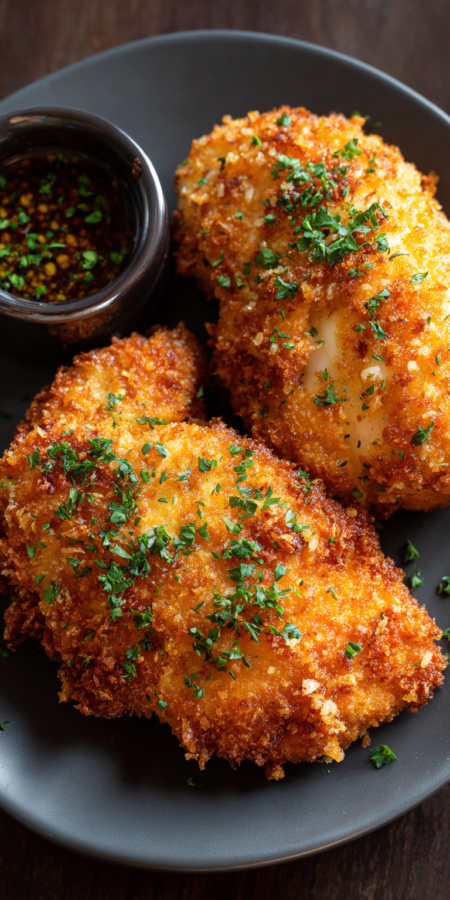
Well, I think I found one. Let me introduce you to our new favorite: Nashville Hot Style Panko Chicken. It sounds fancy, but I promise it’s just crispy, baked chicken with a fun, customizable kick.

It’s the perfect solution for when you want something exciting for you but still totally approachable for the kids. This recipe is a game-changer for turning a spicy classic into a family-friendly weeknight hero.
Recipe Overview
- Cuisine: American (Southern-inspired)
- Category: Main Course
- Prep Time: 15 minutes
- Cook Time: 20 minutes
- Total Time: 35 minutes
- Servings: 4
Why Even My Picky Eaters Love This!
My kids went for this immediately, and I think I know why. First, that panko breadcrumb coating bakes up incredibly crispy and crunchy. It’s like the best part of a chicken nugget, but way better.
Second, and this is the real trick, the “Nashville Hot” part is totally in your control. We make the spicy glaze separately. The kids get the plain, super-crispy chicken, and the adults can drizzle on as much heat as they want. Everyone wins!
Our Family-Friendly Ingredient List
I keep things simple. You probably have most of this already. No fancy grocery store trips needed!
- 1.5 lbs boneless, skinless chicken breasts or tenders
- 1 cup all-purpose flour
- 2 large eggs
- 2 cups panko breadcrumbs
- 1 tsp garlic powder, 1 tsp paprika, salt & pepper
- For the Glaze: 1/4 cup melted butter or hot honey, 1-2 tbsp brown sugar, 1-2 tsp cayenne pepper (adjustable!), 1/2 tsp garlic powder
- Your favorite sides: fries, roasted broccoli, a simple salad, or dinner rolls.
How to Get the Kids Involved in Cooking This
Getting little hands involved makes them so much more excited to eat. My two love helping with these easy jobs.
For younger kids, setting up the “dipping station” is a perfect task. Let them arrange the three bowls: one with flour, one with beaten eggs, and one with panko. It’s like a little assembly line!
Older kids can do the actual dipping and coating. It’s a bit messy, but that’s half the fun. Just put down some parchment paper for easy cleanup.
The Full Step-by-Step Instructions
Don’t let the steps fool you—this comes together fast. The key is getting everything set up before you start.
Nashville Hot Style Panko Chicken Recipe
Our Family-Friendly Ingredient List
The Full Step-by-Step Instructions
Notes
Enjoy your homemade Nashville Hot Style Panko Chicken Recipe!
Nutrition Information
- Preheat your oven to 425°F (220°C). Line a baking sheet with parchment paper and place a wire rack on top. This keeps the chicken crispy all around.
- Cut your chicken breasts into even strips, about 1-inch thick. Pat them very dry with paper towels. This helps the coating stick!
- Set up your three bowls. In the first, mix flour with garlic powder, paprika, salt, and pepper. In the second, beat the eggs with a splash of water. Put the plain panko in the third.
- Dredge each chicken piece. First coat it in the flour, then dip in the egg, and finally press it into the panko until fully covered. Place it on the wire rack.
- Bake for 18-22 minutes, until the chicken is cooked through and the coating is golden brown and crispy.
- While the chicken bakes, make the glaze. In a small bowl, whisk together the melted butter, brown sugar, cayenne, and garlic powder. Start with 1 tsp of cayenne and add more if you like it hot!
- When the chicken is done, you have choices. Brush the spicy glaze over all the pieces for a full-hot experience. Or, serve the glaze on the side for dipping. This is our go-to method.
Fun Twists for Different Tastes
The beauty of this dish is how easily you can change it up. Here are our family’s favorite ways to mix it up.
For sensitive kids, just serve the sauce on the side. They get the fun, crunchy chicken without any spice scare. You can even make two glazes—one spicy and one with just butter and a little honey.
Add bacon for the adults! Crumble some cooked bacon into the panko breadcrumbs. It adds a smoky, salty crunch that’s absolutely amazing with the spicy glaze.
Try it with different sauces. My daughter loves hers with a little ranch for dipping. My husband mixes the spicy glaze with a bit of barbecue sauce for a sweet-heat combo. For another easy meal that uses ranch seasoning in a delicious way, check out this Ranch-Style Chicken Taco Soup.
Storing & Reheating (Perfect for Busy Nights)
This chicken makes fantastic leftovers for lunches or a super-quick second dinner. Here’s how to keep it crispy.
Let the chicken cool completely. Store it in an airtight container in the fridge for up to 3 days. To reheat, do NOT use the microwave—it gets soggy.
Instead, pop it back on a wire rack over a baking sheet. Warm it in a 375°F oven for about 10 minutes, until hot and re-crisped. It works like a charm every time.
Nutrition Notes
- This is a baked recipe, so it uses much less oil than traditional frying.
- Chicken breast is a great source of lean protein to keep everyone full.
- Using a wire rack helps excess fat drip away from the food.
- You control the sugar and salt, making it easy to adjust to your family’s needs.
- Serve with veggie sides to make it a balanced plate.
FREQUENTLY ASKED QUESTIONS
Can I make this gluten-free?
Absolutely! Just use a 1-to-1 gluten-free flour blend and gluten-free panko-style breadcrumbs. The method stays exactly the same.
My family hates spicy food. Can we skip the glaze?
Of course! The panko chicken is delicious all on its own. You can season the panko with a little extra garlic powder or dried herbs for more flavor without any heat.

Can I use chicken thighs instead?
Yes, boneless, skinless thighs work great. They might need a minute or two longer in the oven. Just make sure the internal temperature reaches 165°F.
So there you have it. Our secret weapon for a dinner that actually makes everyone at the table happy. It’s crunchy, it’s fun, and it lets everyone build their perfect plate.
I know how tough mealtime can be. I really hope this recipe brings a little peace (and a lot of crunch) to your table. Give it a try this week! And if you need a truly hands-off dinner solution, this Ranch-Style Chicken Taco Soup: Easy Crockpot Meal is another fantastic option for busy nights.
I’d love to know if this was a hit with your family! Please leave a comment and rating below!