You’ve made Oreo truffles before. We all have. But I bet they were just good, not unforgettable.
That ends today. This Oreo Truffles No Bake Dessert has one secret move that changes everything. It’s not about adding something fancy. If you love creative no-bake treats, you should definitely try our recipe for Oreo Sushi Rolls next.
It’s about taking something away. Ready to see how a simple subtraction creates the most perfect, gift-worthy treat?
Recipe Overview
Let’s get the basics out of the way. This is your new foundation.
- Cuisine: American
- Category: Dessert
- Prep Time: 30 minutes
- Cook Time: 0 minutes
- Total Time: 1 hour 30 minutes (includes chilling)
- Servings: 24-30 truffles
The Secret Ingredient That Makes All the Difference
Here it is. The game-changer isn’t in the bowl. It’s what you leave on the counter.
Most recipes tell you to use cold cream cheese straight from the fridge. That’s your first mistake. Cold cream cheese is too firm. It never fully incorporates with the cookie crumbs.
You get a streaky, lumpy base. Your food processor works overtime for a mix that’s still uneven.
The secret? Use room temperature cream cheese. Let it sit out for a good hour. It blends into the Oreo crumbs in seconds. You get a silky, homogenous, perfect dough every single time. No streaks. No lumps. Just smooth, rollable perfection.
Why This Method is Better (My Pro-Tips)
I don’t just mix and dip. I build layers of flavor and texture. Here’s my thinking.
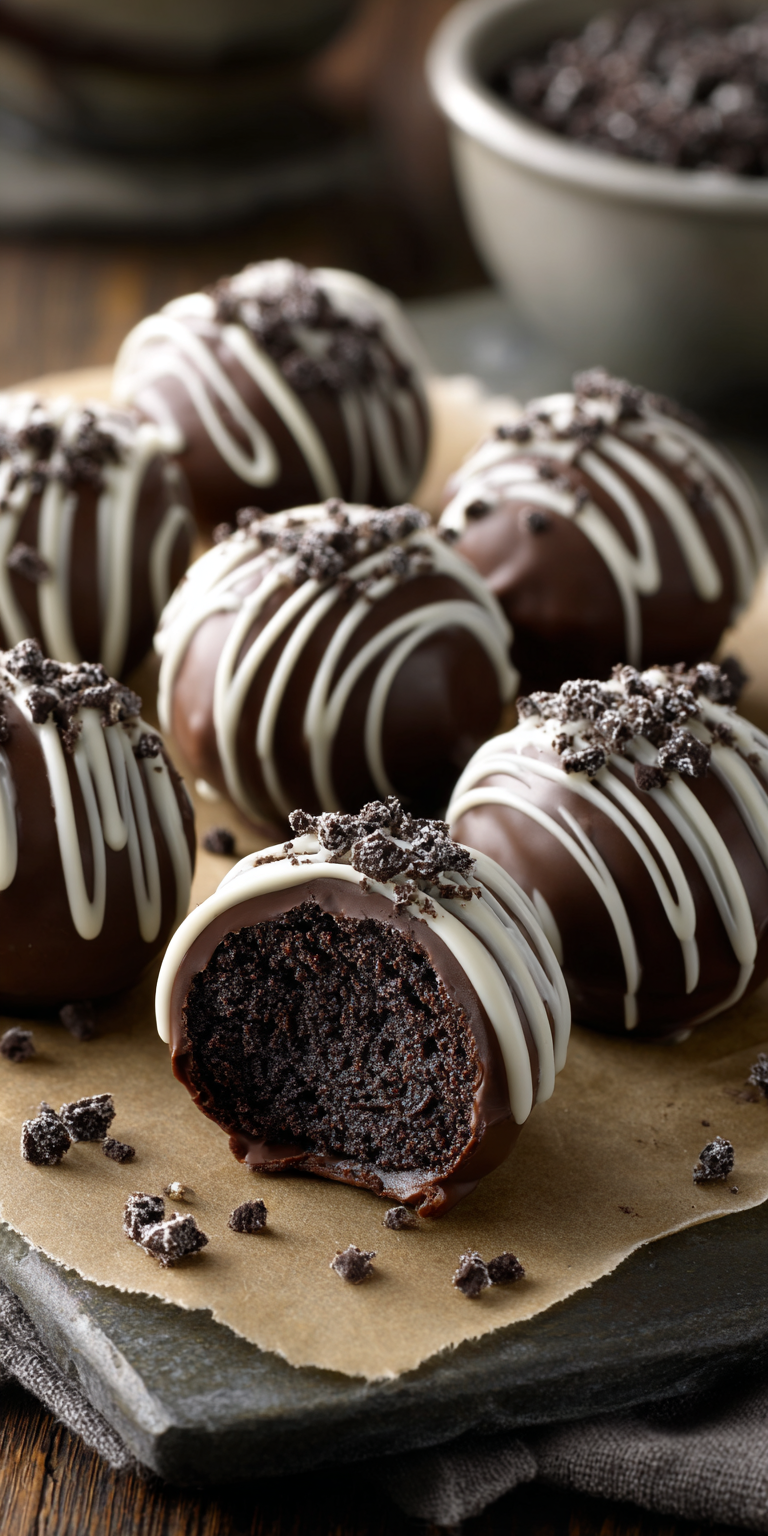
Oreo Truffles No Bake Dessert Recipe
The “Upgraded” Ingredient List
The Pro-Method (Step-by-Step)
Notes
Enjoy your homemade Oreo Truffles No Bake Dessert Recipe!
Nutrition Information
First, I pulse the Oreos super fine. You want dust, not pebbles. This gives the truffle center its signature melt-in-your-mouth quality. Second, I chill the balls twice. Once before dipping, and once after. This sets the chocolate shell perfectly without smudges.
Finally, I always use a fork and a toothpick for dipping. The fork lets excess chocolate drip away. The toothpick gives you a clean, professional finish with no finger marks.
The “Upgraded” Ingredient List
Quality in, quality out. Here’s exactly what you need.
- 1 (14.3 oz) package Oreo Cookies (Regular. Don’t get fancy yet.)
- 8 oz full-fat brick cream cheese, room temperature (This is non-negotiable.)
- 12 oz high-quality semi-sweet or dark chocolate melting wafers (Not chocolate chips. Wafers temper better.)
- 1 tsp coconut oil or shortening (For thinning the chocolate.)
- Optional: White chocolate, sprinkles, or crushed Oreo crumbs for topping.
The Pro-Method (Step-by-Step)
Follow these steps in order. Precision is key here.
- Pulse to Dust: Place all Oreos (cream filling included) in a food processor. Pulse until you have fine, even crumbs. No big pieces left.
- The Perfect Mix: Add your room-temperature cream cheese to the crumbs. Process until it comes together in a uniform, black dough. This takes about 30 seconds. Scrape the bowl once to make sure.
- Portion & Roll: Use a small cookie scoop (about 1 tbsp) to portion the dough. Roll each portion into a smooth, tight ball between your palms. Place on a parchment-lined baking sheet.
- The First Chill: Freeze the balls for 15 minutes. Don’t skip this! They need to be very firm but not frozen solid.
- Prep Your Chocolate: Melt the chocolate wafers with the coconut oil in a deep, narrow bowl. Use 30-second bursts in the microwave, stirring well between each.
- The Dip: Spear a chilled ball with a toothpick. Dip it into the chocolate, tap off the excess against the bowl’s rim, and use a fork to slide it onto clean parchment.
- Top Immediately: Add any sprinkles or toppings right after dipping, before the chocolate sets.
- The Final Set: Let the truffles set at room temperature until the chocolate is firm. For a super crisp shell, pop them in the fridge for 10 final minutes.
Common Mistakes & How to Fix Them
I’ve seen these errors a thousand times. Let’s avoid them.
Problem: The mixture is too sticky or soft to roll. Fix: You likely used warm cream cheese or over-processed. Pop the whole bowl of mixture in the fridge for 20 minutes to firm up. Your hands will stay cleaner, too.
Problem: The chocolate coating is thick, clumpy, and cracks. Fix: Your chocolate was too hot or too thick. Next time, thin it with a bit more coconut oil. Let the melted chocolate cool for a minute before dipping. The truffle center should be cold, the chocolate warm, not hot.
Problem: The truffles have a white “bloom” after setting. Fix: This is cocoa butter separation. It happens if chocolate is heated too quickly or gets damp. It’s still safe to eat! To prevent it, melt your chocolate slowly and make sure your truffle balls are completely dry before dipping.
Variations for the Adventurous Cook
Mastered the classic? Let’s play. These are my favorite pro swaps.
Swap the Oreos. Use Mint Oreos and dip them in dark chocolate. Try Peanut Butter Oreos rolled in crushed peanuts. Golden Oreos with white chocolate and a sprinkle of sea salt is a next-level move. For another fun, no-bake project that uses Oreos in a completely different way, check out this fun and easy Oreo sushi rolls dessert.
Infuse the cream cheese. Add a tablespoon of espresso powder or a splash of your favorite liqueur to the mix. Just account for the extra liquid.
For the coating, mix things up. Use a 50/50 blend of milk and dark chocolate wafers. Or drizzle finished truffles with a contrasting chocolate color for a bakery-style finish.
Nutrition Notes
Let’s be real. This is a treat. Enjoy it as one. A standard truffle has roughly:
- Calories: 120-150
- Fat: 8g
- Carbohydrates: 12g
- Sugar: 9g
- Protein: 1g
These are estimates. Values change with your specific ingredients and size.
Your Pro-Level Questions Answered
These are the smart questions I get from readers who pay attention.
Can I make these truffles ahead of time?
Absolutely. They are the ultimate make-ahead dessert. Store finished truffles in a single layer in an airtight container in the fridge for up to a week. For longer storage, freeze them for up to 3 months. Thaw in the fridge overnight.
What’s the best way to package these as gifts?
You’ve made a premium product. Package it like one. Use small, decorative cardboard gift boxes or clear cellophane bags. Layer truffles between sheets of parchment paper in a box. Tie bags with ribbon. A simple, handwritten label with the flavor and “keep refrigerated” makes it extra special.
My coating keeps sliding off! Help?
This means your truffle center is too warm or oily. Make sure you freeze the balls adequately before dipping. Also, check that your Oreo crumb mixture isn’t too wet. If you added any liquid flavorings, that could be the culprit. Stick to the base recipe first.
A Few Final Secrets
You now have the blueprint. But the real magic is in the details. Always taste your melted chocolate. If it doesn’t taste good alone, it won’t taste good on the truffle.
Clean your fork and toothpick between dips. Wipe off chocolate buildup for a smoother process. Most importantly, have fun. These are supposed to be joy in a bite-sized package. If you’re looking for more no-fuss, delicious ideas, our guide to an easy no-bake Oreo dessert is a great place to start.
Now that you have the secret, go try it! I want to hear all about it. Did the room-temperature cream cheese change the game for you? What wild variation did you create? Let me know your results and share your photos in the comments below!